Coaster & Multipurpose Pattern | Crochet Solid Square Tutorial

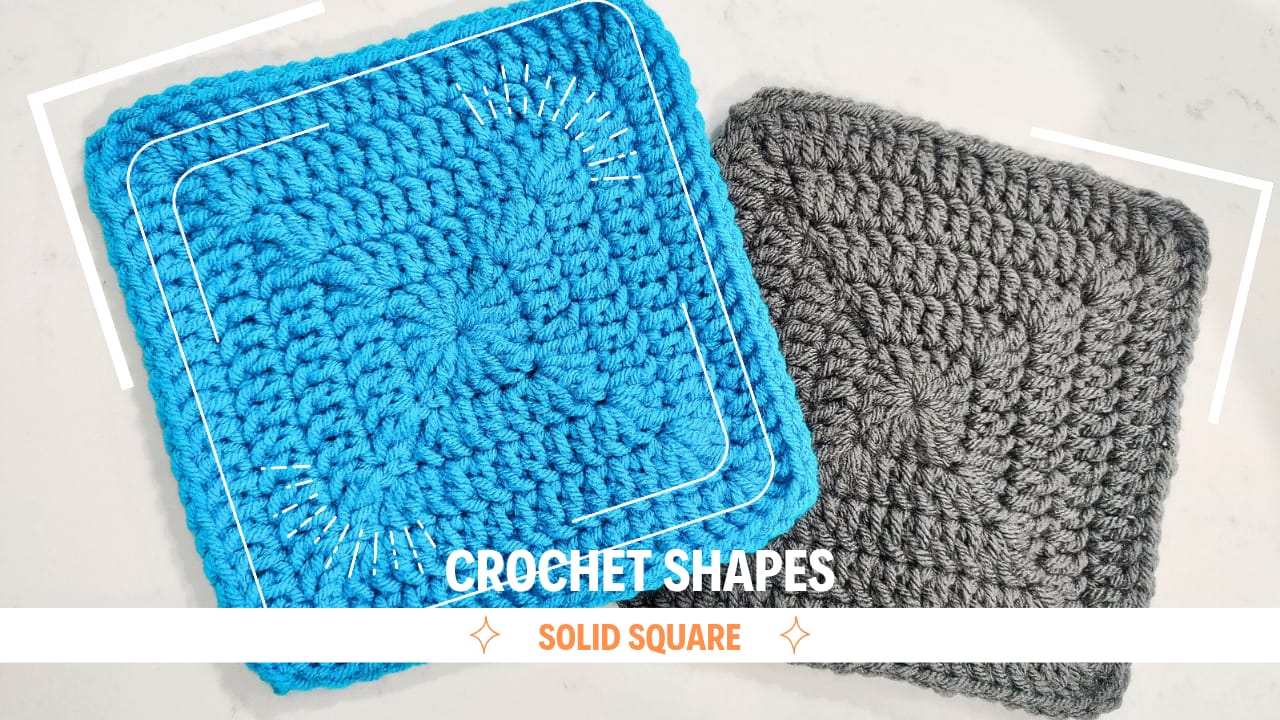
In this tutorial, you will learn how to crochet a perfect solid square without any gaps! Whether you're making coasters, blankets, or bags, this simple yet effective pattern will help you create a neat and beautiful crochet square.


Materials Required:

       
  • Yarn: 4-ply medium weight acrylic yarn (or any yarn of your choice)
  •    
  • Hook Size: 4mm crochet hook (adjust according to yarn type)
  •    
  • Tapestry Needle: To weave in ends
  •    
  • Scissors: For trimming excess thread

Step-by-Step Crochet Solid Square Pattern

Row 1: Foundation & First Layer
  1. Start with a Magic Ring.
  2.    
  3. Chain 4 (this forms the first corner).
  4.    
  5. Make 3 double crochet (DC) stitches for the first side.
  6.    
  7. Make 1 triple crochet (TC) stitch for the second corner.
  8.    
  9. Repeat this pattern for all 4 corners and 4 sides.
  10.    
  11. Slip stitch to the fourth chain from the start to close the round.

Row 2: Expanding the Square
  1. Chain 4 and mark the 4th chain.
  2.    
  3. In the same stitch, make 2 DC stitches.
  4.    
  5. For each side, make 3 DC stitches over previous stitches.
  6.    
  7. For corners: 2 DC, 1 TC (corner), 2 DC in the same stitch.

Row 3 & Beyond: Building the Square
  1. Each new row increases the side count by 4 additional stitches.
  2.    
  3. Corner pattern remains the same: 2 DC, 1 TC, 2 DC in the same stitch.
  4.    
  5. Continue adding rows until you reach the desired size.

Final Touches
   
  • Once your square is the required size, fasten off and secure the stitches.
  •    
  • Weave in the loose ends using a tapestry needle.
  •    
  • Trim excess yarn and shape the square if needed.

Uses of Crochet Solid Square
  • As a coaster for mugs & cups
  •    
  • Join multiple squares to make a blanket
  •    
  • Use it as a patch for bags & clothing
  •    
  • Make it into a pillow cover or table mat

Watch the Full Video Tutorial

For a detailed step-by-step visual guide, watch the tutorial now:

Watch Now:


Final Thoughts

This crochet solid square is a great beginner-friendly project that can be used in multiple ways. Try this pattern and let me know how it worked for you in the comments below! Happy Crocheting!

Don't forget to:

Happy Crocheting!

Free Crochet Peacock Patter - Easy & Beautiful Applique Tutorial

Crochet Peacock Feather Applique – Easy & Beautiful Pattern

Looking for a unique and stunning crochet project? This simple and easy-to-make Crochet Peacock Feather Applique is perfect for adding a touch of elegance to your crafts! Whether you're making a keychain, bookmark, applique, or even a baby blanket, this peacock feather pattern is versatile and gorgeous. Follow the step-by-step pattern and create your own masterpiece!

Why You'll Love This Crochet Peacock Feather?

       
  • Beautiful and Eye-Catching – The vibrant colors make it stand out.
  •    
  • Multi-Purpose – Use it as a keychain, bookmark, or applique.
  •    
  • Great for Gifting – Handmade gifts are always special!
  •    
  • Beginner-Friendly – Simple stitches with a stunning outcome.

Materials Required:

       
  • Mercerized cotton yarn – 6 bright shades
  •    
  • Crochet hook – 1.6 mm
  •    
  • Tapestry needle
  •    
  • Pair of scissors

Colors Used:

       
  • Colour A: Navy Blue
  •    
  • Colour B: Light Purple
  •    
  • Colour C: Yellow
  •    
  • Colour D: Orange
  •    
  • Colour E: Dark Purple
  •    
  • Colour F: Green


Step-by-Step Crochet Peacock Feather Pattern

Start with Colour A:

ch-5 to form a ring

Round 1:

CH-3, 14 DC (15)

Change to Colour B:

R-2: DC INC *7, (3DC), DC INC *7 (31)

Change to Colour C:

R-3: CH-1, 13 SC, HDC INC, (DC,TC), (3TC), (TC,DC), HDC INC, 13 SC, SS (37)

Change to Colour D:

R-4: (DC INC, 2DC)*5, DC INC, DC, DC INC, (3DC), DC INC, DC, DC INC, (2DC, DC INC)*5 (53)

Change to Colour E:

R-5: CH-1, SC INC, 25 SC, (3SC), 25 SC, SC INC, SS (57)

Change to Colour F:

R-6: (CH-3,DC), HDC INC, SK 1, [(SC,CH-4, SC), SK 1] *12

(HDC, CH-3 PICOT, DC), (TC, CH-3 PICOT, DC), (DC, CH-3 PICOT, HDC), SK1,

[(SC, CH-4, SC),SK1]*12, HDC INC, DC INC, CH-3 PICOT, SS

Fasten off and leave a small tail end. Weave in the ends and trim the excess thread.


Adding Final Details:

With the help of a tapestry needle and two strands of Colour C, add detailing to the center of the feather (third row) to enhance its realistic look.


Creative Ideas for Using This Peacock Feather:

       
  • Make it into a Keychain – Add a ring and turn it into a stylish accessory.
  •    
  • Use as a Bookmark – Attach a long tassel for an elegant touch.
  •    
  • Create a Blanket or Baby Dress – Join multiple feathers for a unique design.
  •    
  • Applique for Crochet Projects – Sew it onto bags, sweaters, or home decor items.

Final Thoughts

This Crochet Peacock Feather Applique is a must-try project for every crochet lover! The combination of colors, stitches, and details makes it a stunning piece to add to your collection.

Subscribe to DIY Kraftz on YouTube for more amazing crochet tutorials in Telugu!

Happy Crocheting!

Learn How to Crochet an Amigurumi Apple: A Step-by-Step Tutorial for Beginners

Are you looking for a fun and easy crochet project? Look no further! In this tutorial, we'll guide you through the process of creating a adorable amigurumi apple using basic crochet stitches.


DIYKraftZ Crochet Amigurumi Apple


Materials Needed:

- Cotton 4ply yarn

- 3mm crochet hook

- Tapestry needle

- Stitch markers

- Fiber fill for stuffing


Shortcuts Used in the Tutorial:

- MR: Magic Ring

- SS: Slip Stitch

- Sc: Single Crochet

- Hdc: Half Double Crochet

- Dc: Double Crochet

- Inc: Two stitches in the same stitch

- Inv Dec: Insert the hook into the front loops of next two stitches and then make a sc

- Fao: Fasten Off


Pattern:

Stem:

1. Take brown yarn and begin with a slip knot.

2. I-cord for 6 times or for required length and fasten off.


Leaf:

1. With green color yarn, begin with a slip knot.

2. Ch-7, sk 1, 1SS, 1Sc, 1Hdc, dc Inc, 1 hdc, 3sc, 1Hdc, 1Sc, dc Inc, 1 hdc, 1Sc, 1SS, FO.


Apple:

1. Begin with MR.

2. R-1: 6sc (6)

3. R-2: 1 SC EACH (6)

4. R-3: Inc*6 (12)

5. R-4: 1 SC each (12)

6. R-5: (1sc, Inc)*6 (18)

7. R-6: (1 SC, Inc, 1sc)*6 (24)

8. R-7: (3sc, Inc)*6 (30)

9. R-8: (2sc, Inc, 2Sc)*6 (36)

10. R-9: (5sc, Inc)*6 (42)

11. R10: (3sc, Inc, 3sc)*6 (48)

12. R-11 to R-14: 1Sc each (48)

13. R-15: (3sc, inv dec, 3sc)*6 (42)

14. R16-18: 1 SC each (42)

15. R-19: (5sc, inv dec)*6 (36)

16. R20-21: 1 SC each (36)

17. R22- (2sc, invdec, 2sc)*6 (30)

18. R23- (3sc, invdec)*6 (24)

19. R-24- (2sc, invdec)*6 (18)

20. Add stuffing here.

21. R25- (1sc, invdec)*6 (12)

22. R-26- 1 SC each (12)

23. R-27: invdec*6 (6)

24. Fasten off with long tail end.


Assembly:

1. With tapestry needle, insert the needle through the front loops of last row and pull the tail end to close the opening.

2. Insert the needle through the center at the bottom to the top, gently pull to get the shape at apple bottom.

3. Make a knot and secure the shape.

4. Insert the needle through the center.

Video Tutorial:

Tips and Variations:

- Use different colors to create a variety of apples.

- Experiment with different yarn weights and textures to change the look and feel of your apple.

- Add details like eyes or a mouth to create a more whimsical design.


Conclusion:

With this step-by-step tutorial, you should now have a beautiful amigurumi apple to add to your collection. Don't forget to share your creations with us and tag us on social media!


Follow Me for More Crochet Inspiration


Related Posts:

MANGO

Leave a Comment:

We'd love to hear from you! Share your thoughts, questions, or feedback in the comments below.

Amigurumi Mango


Amigurumi Mango - Free Crochet Pattern

Learn how to crochet this super cute amigurumi mango! This beginner-friendly pattern is great for handmade toys, gifts, or playful keychains. Let's get started!

Crochet DIYKraftZ Mango


Materials Needed:

  • Cotton 4ply yarn (Yellow, Green, and Brown)
  • 3mm Crochet hook
  • Tapestry needle
  • Stitch markers
  • Fiberfill stuffing

Abbreviations:

  • MR - Magic Ring
  • SC - Single Crochet
  • HDC - Half Double Crochet
  • DC - Double Crochet
  • INC - Increase (2 SC in one stitch)
  • Inv DEC - Invisible Decrease
  • SL ST - Slip Stitch
  • CH - Chain
  • FO - Fasten Off

Pattern:

Stem

With brown yarn, make a slip knot.

Crochet an i-cord for 8 stitches or as long as desired. FO, leaving a long tail for sewing.

Leaf

With green yarn, CH 8.

Work back: SK 1, SL ST, SC, HDC INC, DC INC, 2 DC, [3 DC, (CH 4, SK 1, 3 SL ST, picot in 3rd DC), 3 DC], 2 DC, DC INC, HDC INC, SC, SL ST, SL ST into starting CH, FO.

Sew the leaf to the stem using a tapestry needle.

Mango

R-1: 6sc (6)

R-2: Inc*6 (12)

R-3: (1sc, Inc)*6 (18)

R-4: (1 SC, Inc, 1sc)*6 (24)

R-5: (3sc, Inc)*6 (30)

R-6,7: 1 SC each (30)

R-8: (2sc, Inc, 2Sc)*6 (36)

R-9: (5sc, Inc)*6 (42)

R-10: 1 SC each (42)

Attach stem & leaf to the top of the mango.

R-11: (3sc, Inc, 3sc)*6 (48)

R-12 to R-16: 1Sc each (48)

R-17: Inv dec,Sc, Invdec, 16 sc, invdec, 2 sc, invdec, 16 sc, invdec, sc, invdec (42)

R-18: 1 SC each (42)

R-19: Inv dec,Sc, Invdec, 13 sc, invdec, 2 sc, invdec, 13 sc, invdec, sc, invdec (36)

R-20: 1 SC each (36)

R-21: Inv dec,Sc, Invdec, 10 sc, invdec, 2 sc, invdec, 10 sc, invdec, sc, invdec (30)

R-22: 1 SC each (30)

Stuff firmly now.

R-23: Inv dec,Sc, Invdec, 7 sc, invdec, 2 sc, invdec, 7 sc, invdec, sc, invdec (24)

R-24,25: 1 SC each (24)

R-26: Inv dec,Sc, Invdec, 4 sc, invdec, 2 sc, invdec, 4 sc, invdec, sc, invdec (18)

R-27,28: 1 SC each (18)

Add stuffing here.

R-29: 2 Invdec, 3 Sc, 2 Invdec, 3 Sc, 2 Invdec (12)

R-30: 1 SC each (12)

R-31: invdec*6 (6)


Fasten off with a long tail. Use a tapestry needle to weave through front loops of last row, pull tight to close. Insert needle into center and hide the end inside the stuffing.

Finishing:

Roll the mango between your hands to shape it evenly. You can embroider or attach a cute face to make it more playful. And that’s it—your amigurumi mango is ready!

Happy Crocheting! Follow us on YouTube for more patterns and tutorials!

Crochet Mini Fluffy Heart

๐Ÿ’– Crochet Mini Fluffy Heart | Easy Amigurumi Pattern

This easy and adorable crochet mini fluffy heart is perfect for keychains, bag tags, garlands, appliques, and gifts. Make them in different colors and use them for room decor, celebrations, or as part of your amigurumi creations.


๐Ÿงต Materials Needed:

  • Cotton 4 ply yarn
  • 3 mm crochet hook
  • Tapestry needle
  • Stitch markers
  • Fiberfill for stuffing

๐Ÿงถ Shortcuts Used in the Video:

  • MR – Magic Ring
  • SS – Slip Stitch
  • SC – Single Crochet
  • INC – Increase (2 stitches in same stitch)
  • FO – Fasten Off

๐Ÿงถ Written Pattern – Mini Fluffy Heart

Begin with MR
R1: CH-1, 6 SC (6)
R2: (1 SC, INC) × 3 (9)
R3: (1 SC, INC, 1 SC) × 3 (12)
R4: (3 SC, INC) × 3 (15)
R5: (2 SC, INC, 2 SC) × 3 (18)
R6: 1 SC in each stitch (18)

Partition at 9 stitches for heart humps:
First 9 stitches form the first hump, remaining 9 form the second.

R7a: 1 SC each (9)
R8a: 1 SC each (9)
Stuff the base and first hump.
FO with long tail to close and weave in ends.

Insert yarn into remaining 9 stitches:
R7b: 1 SC each (9)
R8b: 1 SC each (9)
Stuff second hump and close with tail end.
Sew gap between humps, weave in excess yarn, and trim.
Add embellishments like keyrings or faces as desired.

Your cute tiny fluffy hearts are ready. Happy crocheting!

๐ŸŽฅ Watch the Full Video Tutorial:

Watch on YOUTUBE

๐Ÿ“Œ More Free Crochet Projects:

Crochet Amigurumi Coffee Cup

Crochet Amigurumi Coffee Cup – A Cute & Easy DIY Gift Idea

Perfect handmade gift for coffee lovers! Create a cozy amigurumi coffee cup using this beginner-friendly pattern.

Crochet Coffee Cup

๐Ÿงก Why You’ll Love This Project

  • Great for gifts, decor, or accessories
  • Beginner-friendly & fun to make
  • Versatile – Keychain, ornament, or display item

๐Ÿงต Materials Needed

  • Cotton 4-ply yarn – Cup base & coffee top
  • White acrylic thread – Cappuccino heart
  • Crochet hooks – 3mm and 1.5mm
  • Polyfill stuffing
  • Safety eyes or kundans (optional)
  • Black embroidery thread – Optional smile
  • Fabric glue & tapestry needle

๐Ÿ“Œ Abbreviations & Stitches

  • MR – Magic Ring
  • SS – Slip Stitch
  • Ch – Chain
  • Sc – Single Crochet
  • BLO – Back Loop Only
  • Inc – Increase
  • DC – Double Crochet
  • TC – Triple Crochet
  • Fo – Fasten Off

๐Ÿงถ Step-by-Step Pattern

1. Cup Base

MR
R1: 10 sc (10)
R2: (Inc) x10 (20)
R3: (1 sc, Inc) x10 (30)
R4: BLO, sc in each (30)
R5–R11: sc in each (30)
R12: Reverse sc (30)

2. Handle

Create a 10-stitch I-cord:

  • Start with slip knot
  • Wrap tail, yarn over, pull through both loops
  • Repeat until desired length

3. Coffee Top

MR
R1: 10 sc (10)
R2: (Inc) x10 (20)
R3: (1 sc, Inc) x10 (30)
R4: sc in each (30)

4. Cappuccino Heart

MR
ch4, 2 TC, 3 DC, ch1, 3 DC, 2 TC, ch4, SS into center
Close ring and leave tail for sewing

5. Assembly

  • Sew heart to coffee top
  • Attach handle across R6–R10
  • Add eyes and smile
  • Stuff the cup with polyfill
  • Stitch coffee top to cup
  • Fo and weave ends

๐ŸŽ€ Finishing Touches

  • Use variegated yarn for a latte look
  • Add tiny beads for sprinkles
  • Use pink yarn for blush cheeks
  • Attach keyring for portability
h3>๐ŸŽฅ Watch the Full Video Tutorial:

Watch on YOUTUBE

๐Ÿ“ฃ Share Your Creations

Tag #DIYKraftz on Instagram & join the crochet fun!

Subscribe to DIY Kraftz on YouTube for more tutorials!

๐Ÿงต Happy Crocheting!