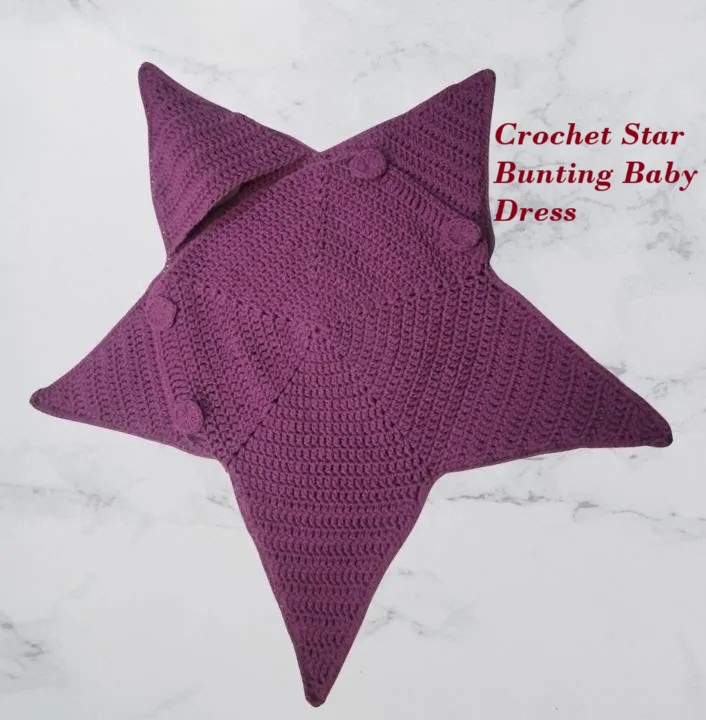
Crochet Star Sleep Bag, Star Bunting Pattern

๐ŸŒŸ Crochet Star Sleep Bag | Star Bunting Pattern for Kids

This cozy and adorable Crochet Star Sleep Bag, also known as a Star Bunting, is perfect for babies and toddlers. The design mimics a 5-pointed star with legs, arms, and a cap to keep your little one warm. This pattern is made in multiple pieces: a pentagon base, star-shaped extensions, triangular sleeves, cap, and assembled with single crochet.


๐Ÿงต Materials Needed:

  • 8 ply acrylic yarn in any color
  • 5 mm crochet hook
  • Yarn needle
  • Buttons or handmade yarn buttons
  • Scissors, stitch marker (optional)

๐Ÿงถ Written Pattern – Crochet Star Sleep Bag

๐Ÿ”น Pentagon Center (Make 2: front & back)
1. Start with ch 5, sl st to form ring.
2. Row 1: ch 4 (counts as dc + ch1), 2 dc in ring, (ch1, 2 dc) × 4.
   Join to 3rd ch of first dc. (5 sides total)
3. Row 2: sl st to ch-1 sp, ch 4, dc in same sp (v-stitch).
   dc in each dc, v-stitch in each ch-1 sp. Join.
4. Row 3+: Continue this pattern, increasing 2 dc per face each round.
   Continue until Row 13 – each side will have 26 dc.


๐Ÿ”น Star Points (Make 5 on back piece, 2 on front piece)
1. Pick any face of 26 sts from Pentagon.
2. Row 1: dc across 26 sts.
3. Rows 2–12: Ch 2, turn. dc2tog at start & end of each row.
4. Row 13: 2 dc2tog (only 2 sts remain)
5. Row 14: Final dc2tog to close tip. Fasten off.


๐Ÿ”น Triangle Arms (Make 2)
Foundationless DC Row – 26 stitches.
Follow same decrease pattern from Row 2 to 14 of star point.


๐Ÿ”น Cap Piece (Front Top)
Foundationless DC Row – 26 stitches.
Rows 2–5: dc in each stitch.
Rows 6–9: 3-dc decrease on both ends.
Rows 10–14: dc2tog on both ends.
Creates a slightly rounded triangular shape.


๐Ÿ”น Assembly Instructions
1. Place front panel on top of back panel.
2. Use single crochet border to join star points, arms, and cap.
3. Align all pieces symmetrically.
4. Leave central front face open for flip.


๐Ÿ”น Finishing Touches
1. On both hand sides, work:
   - Row 1: trc dec, 2 trc, ch 1 (button hole), trc to end, trc dec.
   - Row 2: sc across entire row.
2. Make 4 Yarn Buttons:
   MR, ch 2, 15 dc into ring. Join, fasten off with tail for sewing.

๐ŸŽฅ Watch the Full Tutorial:

Watch on YOUTUBE

๐Ÿ“Œ Related Free Patterns & Resources:

This crochet star bunting is a sweet, thoughtful project for gifting or cuddling your little ones! Let me know in the comments how your version turned out. ๐Ÿ’–

Pattern - Crochet Baby Star Bunting/Snuggle Suit/Bodysuit - Instant Download Crochet Pattern

pattern-crochet-baby-star-buntingsnuggle

Absolute Beginner Crochet Mobile Cover

๐Ÿงถ Crochet Mobile Cover | Easy Sling Bag Tutorial for Beginners

This super beginner-friendly crochet mobile cover tutorial can also be used to make a cute sling bag. In this post, you’ll learn the exact step-by-step method to make this project using just single and double crochet stitches. Whether you’re making it as a wristlet or a full crossbody sling, this project is fully customizable to any phone size!

Crochet Mobile Cover Tutorial

๐Ÿงต Materials Needed:

  • 4 ply medium worsted weight acrylic yarn
  • 4 mm crochet hook
  • Scissors
  • Tapestry needle
  • Stitch marker
  • Button (decorative)

๐Ÿงถ Written Pattern:

๐Ÿ”น Base & Round 1:
- Make a slip knot and chain 12 (or as needed for your phone’s width, in multiple of 2 + 1)
- Skip 1 chain, sc into the next 12 chains.
- Turn to the other side of the foundation chain and work 12 sc in the back loops.
- Join with a slip stitch to first sc. (24 sc total)

๐Ÿ”น Round 2:
- ch 3 (counts as dc), mark it.
- ch 1, *skip 1 st, dc in next* around.
- Repeat: dc, ch 1, skip 1 st.
- Join with sl st to top of ch 3.


๐Ÿ”น Round 3:
- sc in every stitch and ch-space from previous round (24 sc)
- Join with sl st.

๐Ÿ”น Round 4 (Repeat Round 2):
- ch 3, ch 1, *skip 1, dc in next* around.
- Join with sl st.

๐Ÿ”น Round 5 (Repeat Round 3):
- sc in each dc and ch-space (24 sc)
- Join with sl st.

๐Ÿ”น Continue alternating Rounds 2 and 3 until desired height (leave 1 inch for border).

๐Ÿ”น Border Rounds:
- 2–3 rounds of sc in each stitch (24 sc each) for firm top edge.

๐Ÿ”น Button Loop:
- After 6 sc, ch 10–15 depending on button size.
- sl st into next st, continue sc to complete the round.

๐Ÿ”น Strap (Optional):
- ch 100–120 for crossbody, or 20–30 for wristlet.
- sl st to opposite edge, weave in ends.


๐Ÿ”น Attach Button:
- Use tapestry needle and matching yarn to sew button to front.

๐Ÿ“บ Watch the Full Tutorial:

Watch on YOUTUBE

๐Ÿงถ More Free Crochet Patterns:

Hope you enjoyed this pattern! Don’t forget to tag us if you make one. Subscribe for more beginner crochet projects!

Crochet Puff Flower

Crochet Puff Flower Tutorial | Easy & Beautiful Puff Stitch Flower for Beginners

Crochet Puff Flower Pattern

This quick and beautiful crochet puff flower is perfect for beginners. It uses puff stitches and basic chains to create a soft, elegant flower that can be used on clips, bags, hats, or decor projects. You can make it in just a few minutes!

Materials Needed:

  • 4 ply cotton yarn in two colors
  • 3 mm crochet hook
  • Scissors
  • Tapestry needle

Written Pattern – Crochet Puff Flower

Start with magic ring

Round 1:
- ch 1 (Do not counts as a stitch)
- 10 sc into ring (10 total)
- sl st to top of first sc

Round 2:
- *ch 3, puff stitch (7 loops) in same stitch continuation puff stitch (6 loops) in second stitch, sl st into same stitch*
- Repeat from * to * around (5 petals total)
- sl st to first puff to close

Fasten off and weave in ends.
Puff center:
- contrast color yarn
- ch-1, puff stitch (6 loops) ch-1 FO

Assembly:
- Attach the puff center on the center of the puff flower using tapestry needle.
- Secure them by making knots on backside of the flower, hide the tail ends and trim the excess threads

Tips & Ideas:

  • Attach to clips for kids or keychains
  • Use it to decorate gift wraps or crochet bags
  • Try different yarn weights for texture variation

Watch the Full Tutorial:

More Free Patterns:

Let me know in the comments where you'd use this puff flower! Don’t forget to subscribe to the channel for more quick and cute crochet tutorials!

Crochet Pear Amigurumi | DIY Play Food Pattern

๐Ÿ Crochet Pear Amigurumi | DIY Play Food Pattern Make this adorable crochet pear to add to your kids’ play kitchen, market ba...